CoStrict API Integration Guide
This guide explains how to configure your own model API in the CoStrict extension and CoStrict CLI (CSC), verify the first request, and manage your API key.
1. Terms
Provider refers to the platform that provides the API service and issues your API key.
Model refers to the model that actually answers questions and performs tasks.
API protocol determines how CoStrict sends requests to the platform. Common protocol types include OpenAI-compatible APIs, Anthropic-compatible APIs, and the Google Gemini API.
Use the protocol, Base URL, API key, and model ID for the same service. A provider may support more than one protocol, and each protocol may use a different URL.
Common providers
CoStrict supports APIs from mainstream model providers. You can connect official APIs from Zhipu AI, Kimi, DeepSeek, and others. You can also use various large language models through platforms such as Alibaba Cloud Model Studio, SiliconFlow, and Volcano Engine Ark Agent Plan after they have been centrally configured by your company administrator.
2. Before you begin
- Install the CoStrict VS Code extension or CSC. If you have not installed either product, see the CoStrict download page or the CSC quickstart.
- Register an account with a model API provider and prepare a valid API key.
- Obtain the API protocol, Base URL, and model ID provided by the service.
- Make sure the account has usable API credit or a valid subscription and access to the target model. Identity verification, payment, and access requirements vary by provider.
- Use a network that can reach the API endpoint.
If your API is supplied through a company gateway, ask your administrator for the complete configuration. Do not replace the company gateway URL with the model vendor's public URL.
Collect these four values before opening CoStrict:
| Setting | What to enter |
|---|---|
| API protocol | The OpenAI-compatible, Anthropic-compatible, or Gemini API protocol stated in the provider's documentation |
| Base URL | The API base address for that protocol, not the provider's home page or console URL |
| API key | A key issued by the same platform and valid for that API |
| Model ID | The exact model identifier that the account is allowed to call |
If the protocol is unclear, ask the provider: “I want to connect this API to CoStrict. Please provide the API protocol, Base URL, and model ID, and confirm whether this API key or plan can be used with the tool.” Never include the real key in a public support request.
3. Get an API key
The following table lists only some common providers, models, and ways to obtain an API key.
| Provider | Common models | Compatible API types | How to obtain an API key |
|---|---|---|---|
| Zhipu AI | GLM-5.3, GLM-5.3-Flash | OpenAI compatible, Anthropic compatible | GLM Coding Plan quickstart |
| DeepSeek | DeepSeek-V4.1-Flash, DeepSeek V4 Pro | OpenAI compatible, Anthropic compatible | API integration guide |
| Kimi (Moonshot AI) | Kimi K3, Kimi K2.7 Code | OpenAI compatible, Anthropic compatible | API quickstart |
General process
- Open the provider's official developer platform and sign in or create an account.
- Complete any required account verification, project creation, or service activation.
- Open the API key or credential management page and create a key for CoStrict.
- Copy the key and store it in a trusted password manager. Paste it into CoStrict only when configuring the provider.
- Use the provider's integration documentation to confirm the protocol, Base URL, and model ID.
Some platforms display the full key only once when it is created. If you can no longer view it, create a new key according to the provider's rules. Do not use your chat account password as an API key.
4. Configure the CoStrict VS Code extension
There are two configuration scenarios: first-time registration and a returning sign-in. Their configuration entry points are different.
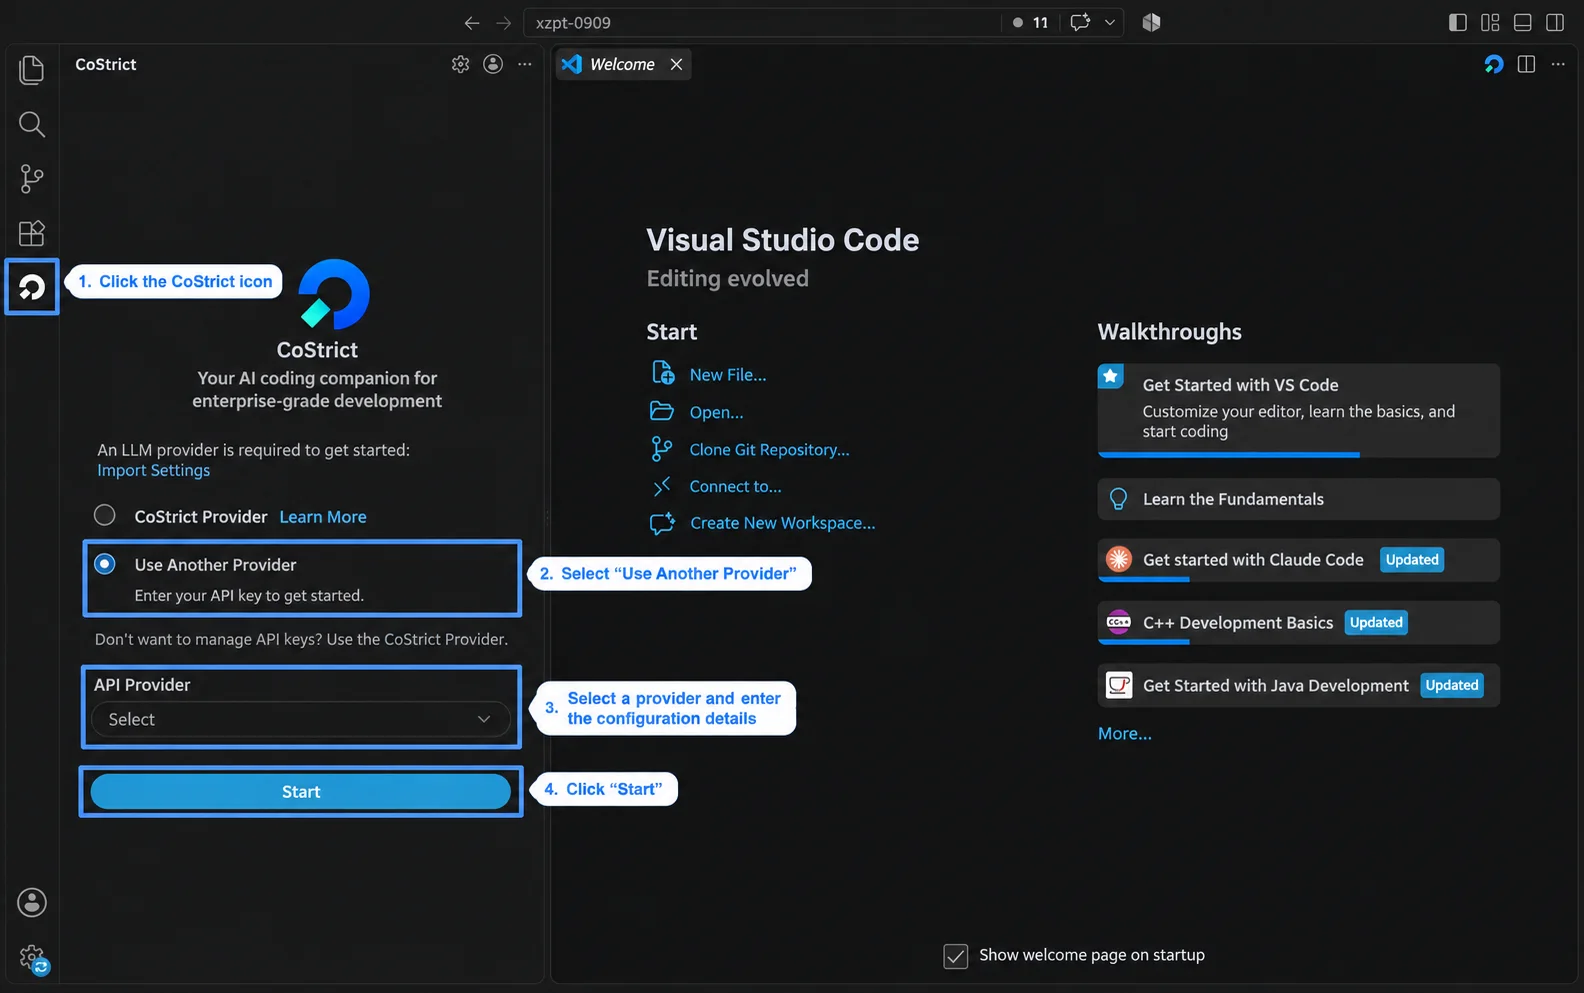
First-time setup
- After installing the extension, first-time users should select the CoStrict icon in the Activity Bar.
- On the sign-in panel, select Use Another Provider.
- Find the provider you want to connect in the provider list and complete the configuration.
- When the configuration is complete, select Sign in to start using CoStrict.
Existing installation
The following steps use an OpenAI-compatible API as an example.
- Open VS Code and select the CoStrict panel.
- Open CoStrict Settings, then select Providers.
- Under Configuration Profiles, create a profile such as
Personal API. To update an existing configuration, select its profile instead. - Set API Provider to
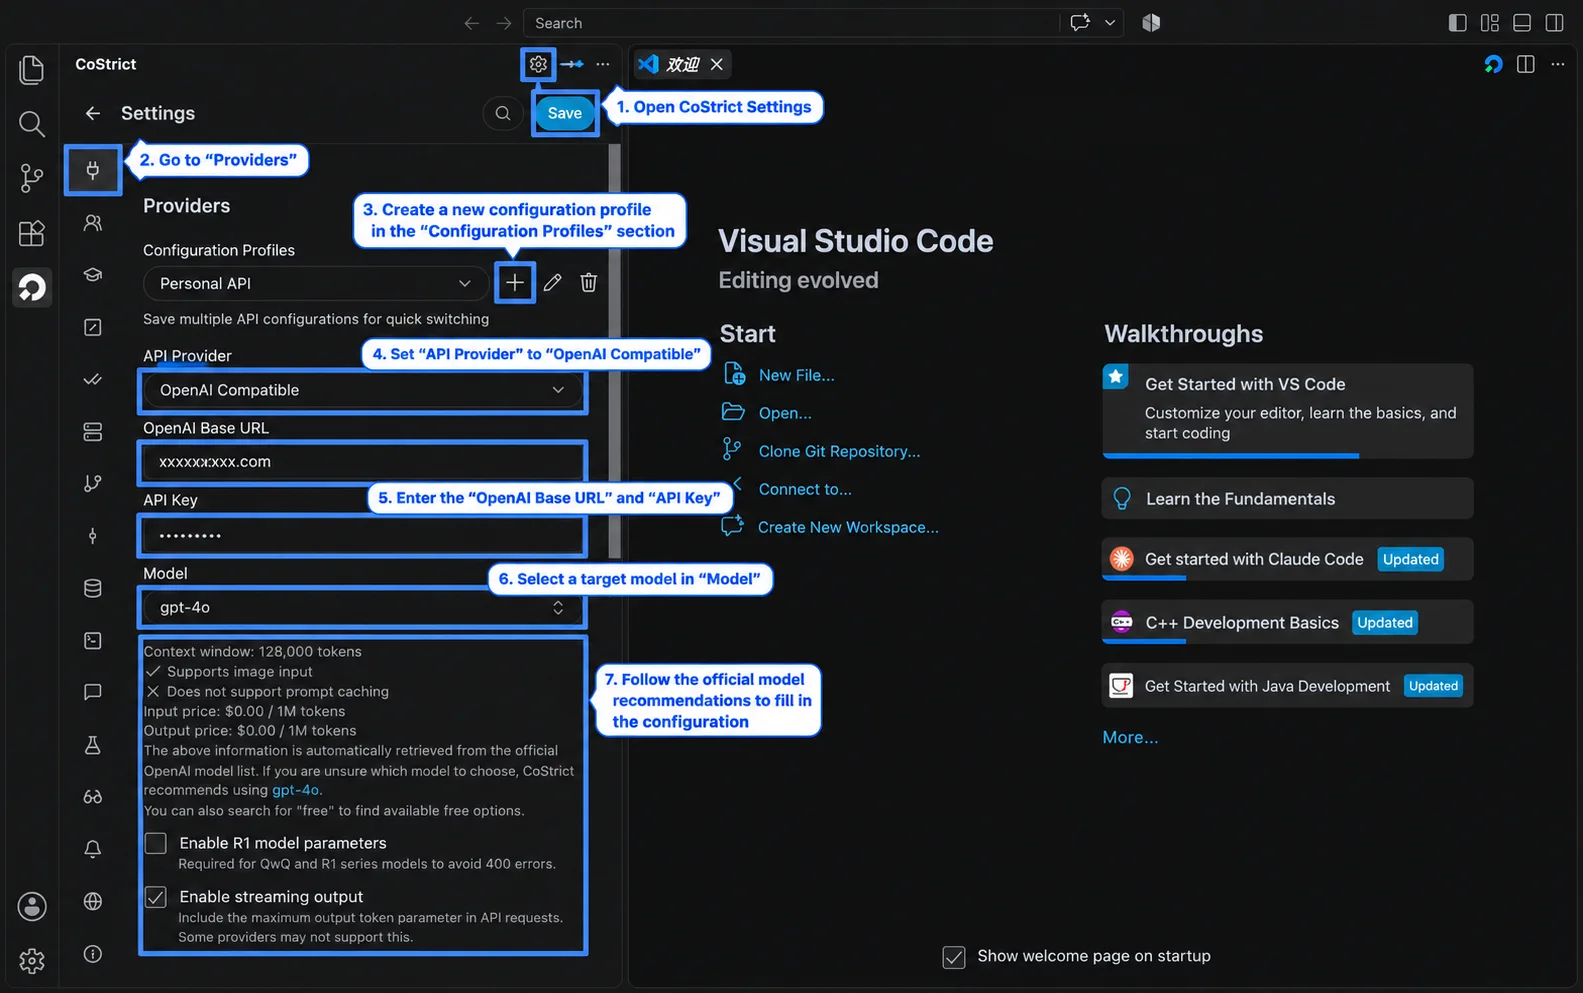
OpenAI Compatible. If a provider-switch warning appears, read it and confirm the change.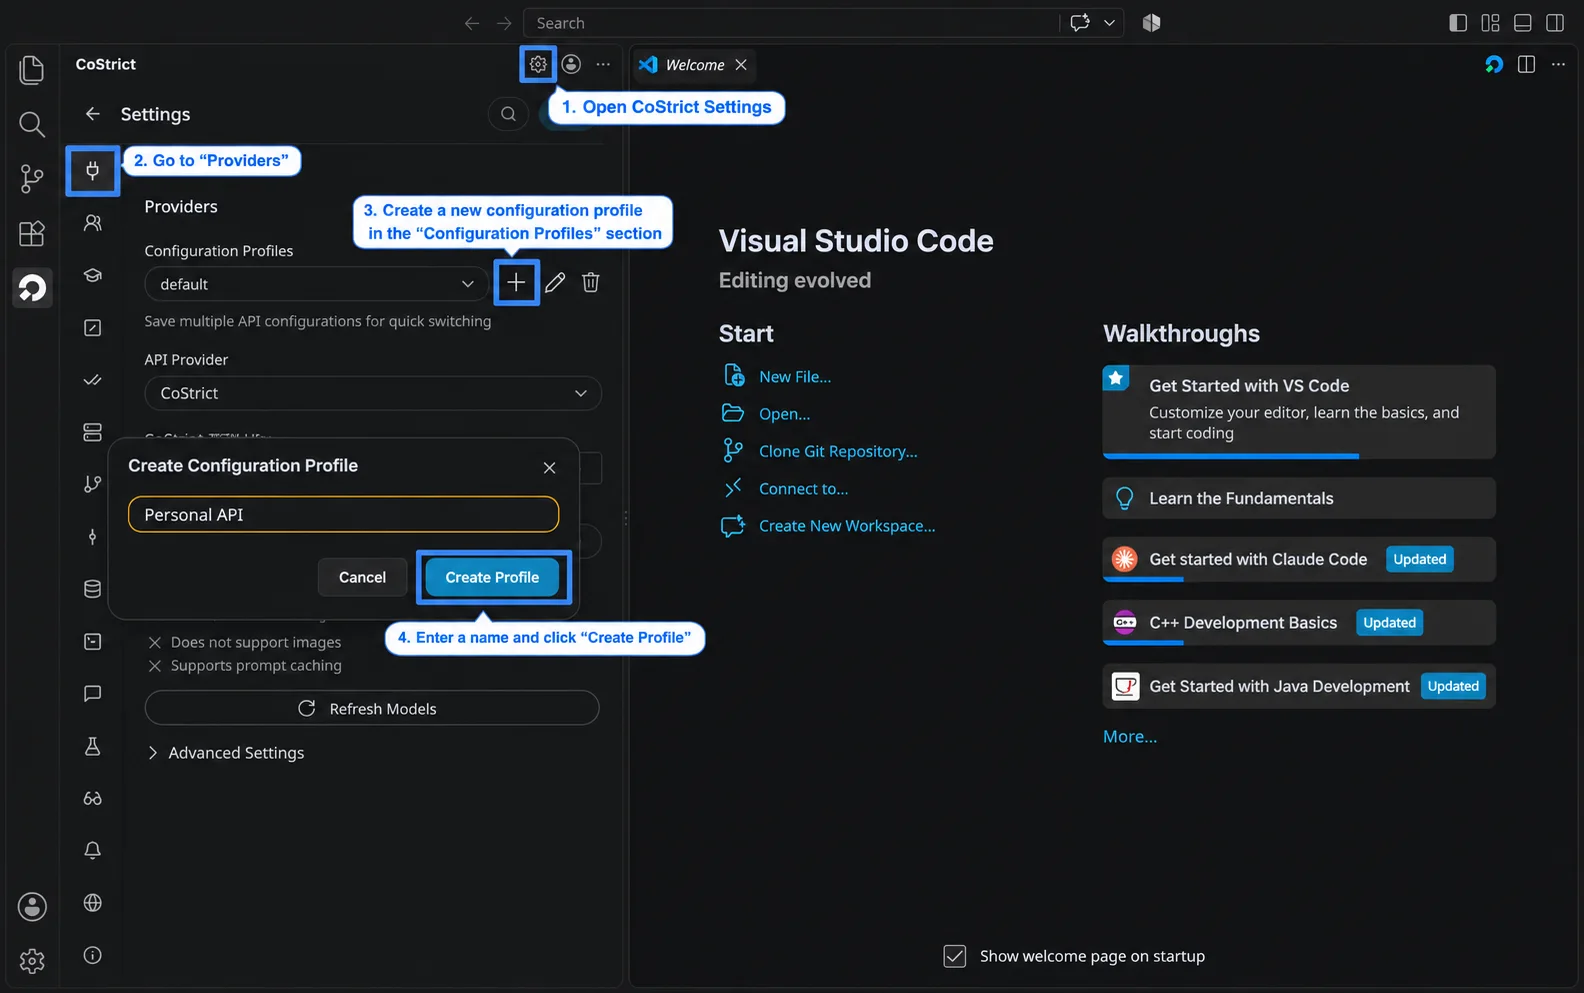
- Enter the OpenAI Base URL and API Key. The field label describes the compatible protocol; enter the key issued by the actual provider.
- Under Model, select the target model. If it is not listed, enter the exact model ID in the model picker and choose the option to use that custom model.
- If you configure the context window, maximum output tokens, image support, or other capabilities, use the model's official specifications.
- Select Save. Return to the conversation panel, confirm that the new configuration and model are active, and create a new task for verification.
A loaded model list or a successful save confirms only that part of the configuration has been accepted. You must still send a real request.
For Anthropic or Google Gemini, select the corresponding provider and enter the key, model, and any custom endpoint required by its official documentation. Do not enter an OpenAI-compatible endpoint under a different protocol.
5. Configure CSC
Run the following commands in a terminal.
-
Open the project directory and start CSC:
csc -
Enter the following command in CSC:
/login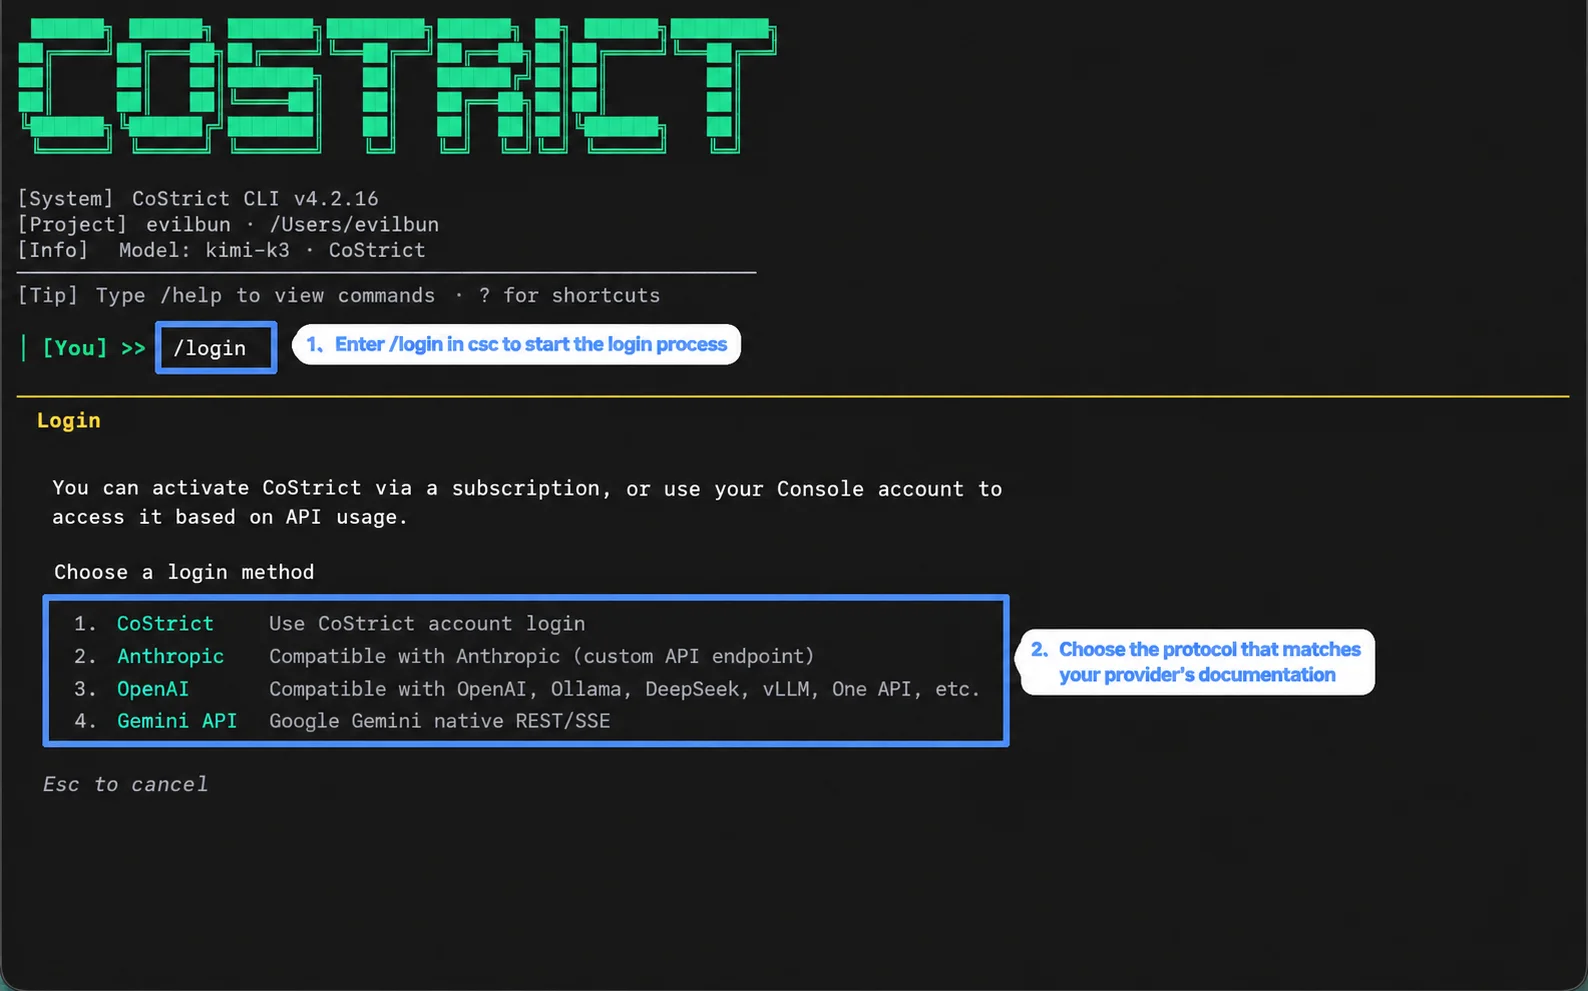
-
Select the protocol stated in the provider's documentation:
OpenAI Compatible,Anthropic Compatible, orGemini API.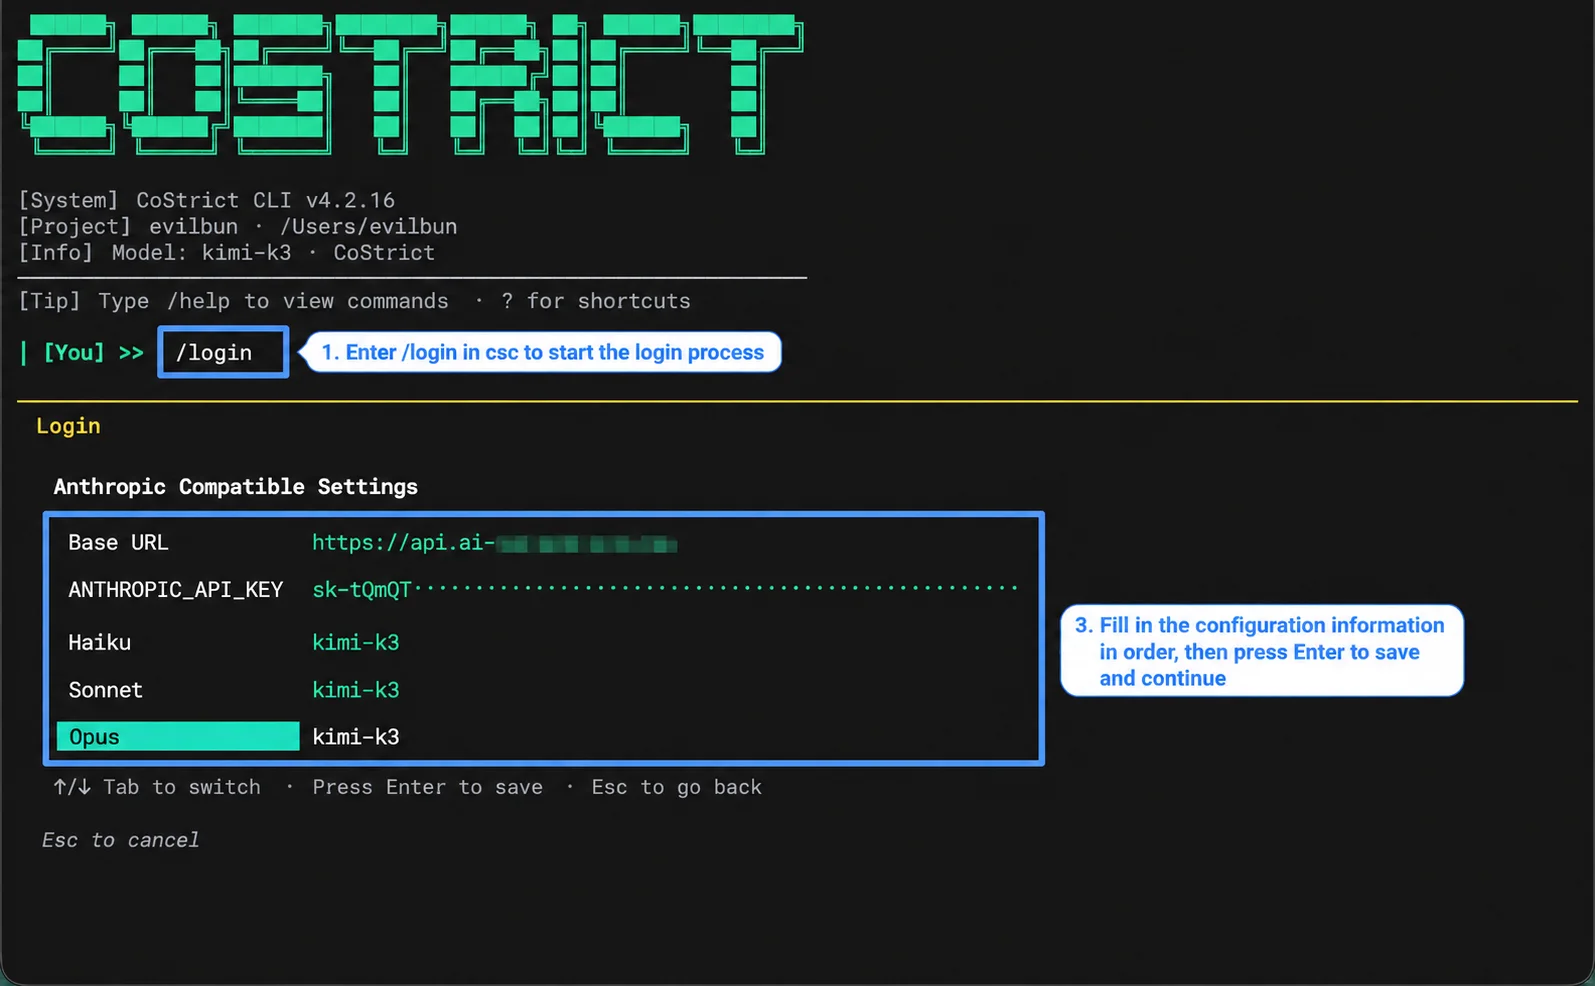
-
Enter the Base URL, API key, and the Haiku, Sonnet, and Opus model mappings in order.
-
Press Enter after each field. Press Enter on the final field to save the configuration.
-
Enter
/model, confirm the model that will be used, and send a test message.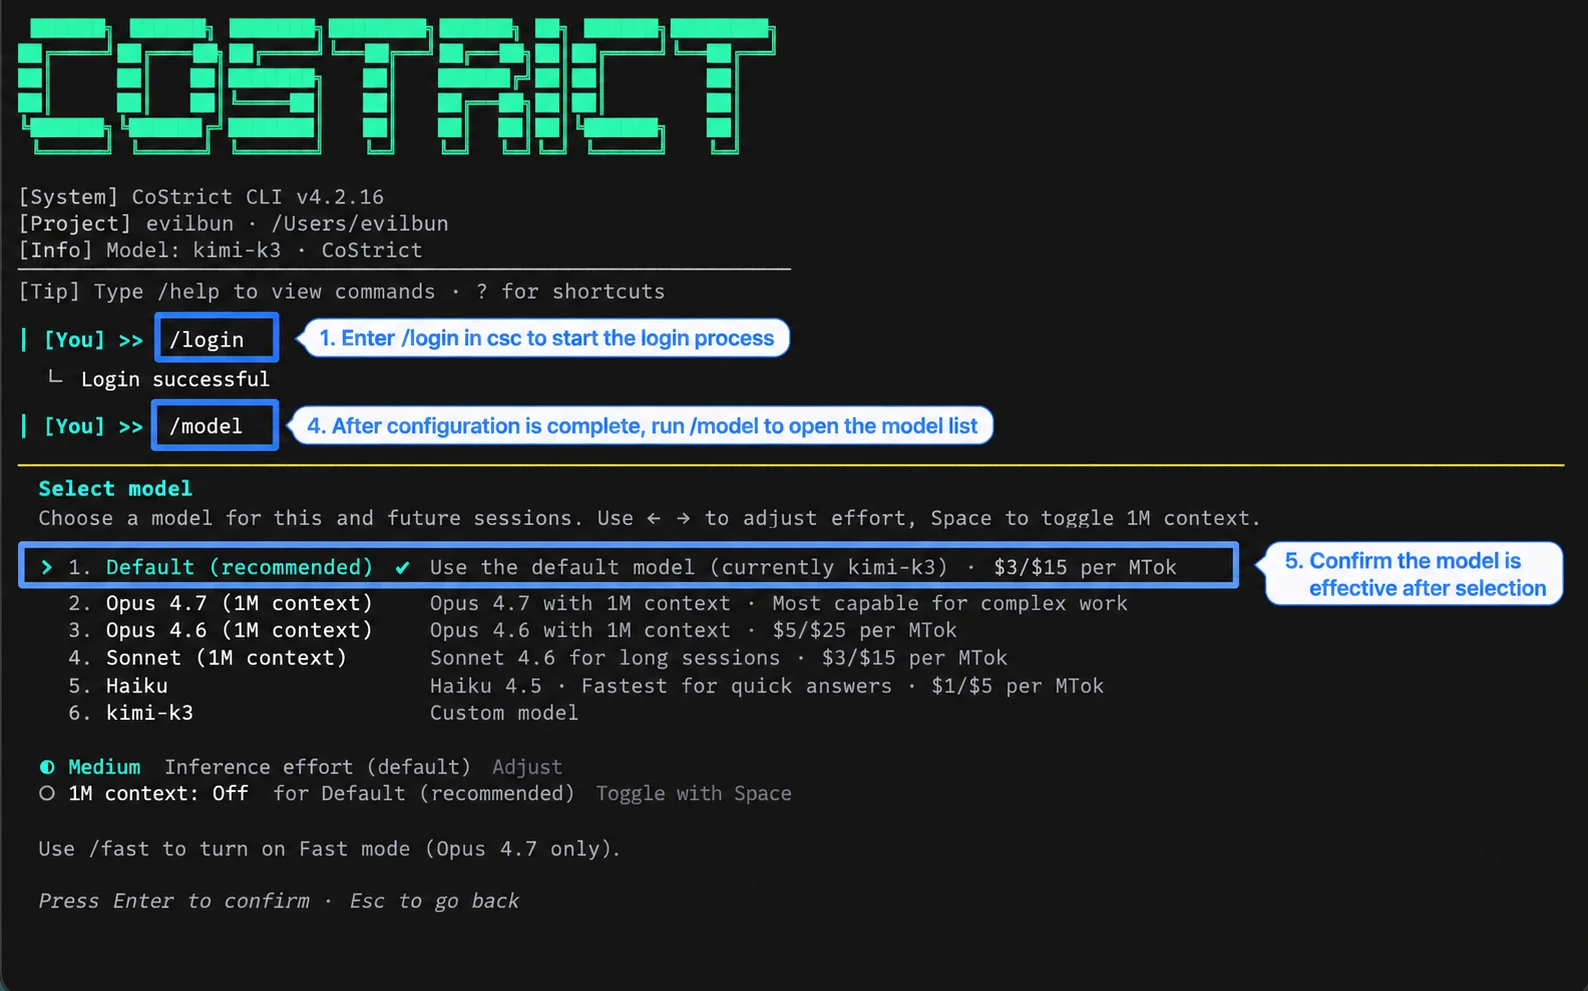
Configure model mappings
Haiku, Sonnet, and Opus are model mapping positions in CSC. When using a third-party provider, enter actual model IDs supplied by that provider. You do not need to buy models from three different providers.
If you currently use only one model, enter the same valid model ID in all three positions. You can assign different models later. For example, if the intended model ID is YOUR_MODEL_ID, enter that ID in all three positions; do not enter the placeholder text literally.
Model IDs, quotas, and capabilities are controlled by the provider. Gemini configuration requires all three model fields.
A successful save message does not replace the actual request verification in the next section.
6. Verify the integration
Step 1: Verify a basic conversation
Confirm the active configuration and model, create a new conversation, and send:
Reply with "Connection successful" only. Do not read files or run commands.
If the model returns a normal response without authentication, permission, or quota errors, the basic model request is working.
Step 2: Verify project reading
Place a simple README.md in a demo project that contains no sensitive information, then send:
Read README.md in the current project and summarize it in two sentences. Do not modify files or run commands.
If a read permission prompt appears, verify the target file before allowing it. Confirm that the file was actually read, that the answer matches its contents, and that no tool call failed.
If basic chat works but file reading fails, check tool-call compatibility and local permissions. Agent use is not fully verified until this works.
If the provider offers request logs, use the request time and model information to verify the call. Logs may appear after a delay. Do not rely on the model's answer to “Which model are you?” to identify the actual backend.
7. API key storage and security
VS Code extension
The extension stores API configuration in VS Code SecretStorage. Manage keys in the extension settings. Do not place a real key in project code or commit it to Git.
CoStrict CLI
In CSC 4.2.38, a third-party key entered through the /login form is written in readable text to the env object in the user-level settings.json. This is separate from storage for CoStrict account credentials.
Default locations:
| System | User configuration file |
|---|---|
| macOS | ~/.costrict/settings.json |
| Windows | %USERPROFILE%\.costrict\settings.json |
The location changes if a custom configuration directory is set. Do not upload this file publicly or share it as a normal project file.
Security guidance
- Paste the key only into its configuration field. Never send it in a chat, group message, issue, or public document.
- Before recording, taking a screenshot, or sharing logs, mask the complete key, including any visible prefix. Inspect exported configuration files; do not assume that exports remove secrets automatically.
- Anyone who receives a key may be able to spend the API quota associated with that account. When supported, create a separate key for each purpose and apply appropriate permissions and spending limits.
- Obtain the Base URL from a trusted provider or company administrator. Sending a key to an untrusted endpoint can expose it.
- Before processing code or documents with a third-party model, confirm that those materials may be sent to that provider.
- If you suspect exposure, revoke the old key on the issuing platform immediately and create a new one. Removing a CoStrict configuration alone does not invalidate a leaked key.
8. Update, replace, or disable an API key
Update the configuration or replace a key
VS Code extension: open Settings → Providers, select the profile, replace the API key, and select Save. Return to the conversation panel, confirm the active profile, and verify it in a new task.
CSC: enter /login again, select the protocol, and enter the new key. If you are changing providers, update the Base URL and all model mappings at the same time. Save the configuration, use /model to confirm the model, and verify it in a new conversation.
For a planned rotation, create and verify the new key before revoking the old key on the provider platform. If the old key has been exposed, revoke it first.
Temporarily stop using a configuration
End any active task, then switch to another valid configuration or close the tool. This does not revoke the provider key and does not mean that a locally saved old key has been removed.
Permanently invalidate an old key
- Sign in to the platform that issued the key.
- Find the key on the credential management page and use the provider's revoke, disable, or delete action.
- Remove the unused CoStrict configuration. If other tools use the same key, update them as well.
In the VS Code extension, open Settings → Providers, select the unused profile, and choose Delete Configuration Profile. The extension does not allow deletion of the only remaining profile; configure a valid replacement first.
In CSC 4.2.38, clearing the key field and saving does not remove an existing key, and /logout does not clear every third-party key. To remove the locally saved value, exit CSC and remove only the applicable old key entry from the env object in the user-level settings.json. Keep all other settings and valid JSON syntax intact:
| Configuration type | Key entry |
|---|---|
| OpenAI compatible | OPENAI_API_KEY |
| Anthropic compatible | ANTHROPIC_AUTH_TOKEN |
| Gemini API | GEMINI_API_KEY |
If you previously set the same key in a system environment variable, terminal startup file, or another configuration source, remove it there as well, then reopen the terminal. Do not delete the entire configuration directory. If you are not comfortable editing JSON, revoke the key on the provider platform first and ask an administrator to remove the local value.
9. Troubleshooting
Error code meanings vary between providers. Use this table for initial troubleshooting, then read the full error message and the provider's error documentation.
| Symptom or error | Common cause | Recommended action |
|---|---|---|
401, Authentication failed, Invalid API Key | The key is wrong, expired, or does not match the endpoint | Copy a valid key again, check for whitespace, and confirm the issuing platform, protocol, and endpoint; save and retry in a new conversation |
403, Permission denied | The account lacks model or project access, or an account or network policy blocks the request | Check model, project, and access permissions; ask the provider or company administrator to confirm |
402, Insufficient balance | No usable balance or quota is available for this service | Check the balance, quota, or subscription under the account that owns the key; do not choose a plan based only on the error code |
404, Model not found | The URL path or model ID is wrong, or the account cannot access the model | Confirm the Base URL and exact model ID; do not enter a console URL or a full /chat/completions request URL as the Base URL in this guide |
400, 422, Invalid parameters | Protocol mismatch, unsupported parameters, or incorrect model capability settings | Follow the fields named in the error; confirm output, image, reasoning, and other settings against the model specification; report a redacted error if it persists |
429, Rate limit | Requests are too frequent or concurrent; some providers also use this code for quota limits | Read the full message; reduce request frequency, stop duplicate tasks, and retry later; check the provider console if it indicates a quota issue |
500, 502, 503, service unavailable | The provider or an intermediate gateway is temporarily unavailable | Retry later and check the provider status; if it continues, give the provider the request ID and time |
| Timeout, connection, DNS, or certificate error | Network, proxy, DNS, endpoint, or certificate configuration issue | Confirm the endpoint and local network; contact the company administrator for managed networks; do not disable certificate validation |
| Context length exceeded | The conversation exceeds the model context limit | Start a new conversation, reduce attached files and input, and verify the model context configuration |
| Model list is empty although the key looks correct | The service does not expose a model-list endpoint, the account lacks permission, or the URL is wrong | Confirm the official model ID; in the extension, try entering a custom model; still send a real message to verify it |
| Chat works but file reading or another tool fails | Tool calls are incompatible, or local permissions were not granted | Inspect the failed step, confirm file-read permissions, and retry in a simple demo project with a redacted error report |
| The old configuration is still used after replacing the key | Changes were not saved, another profile is active, or a running process or other source still contains the old value | Confirm the saved and active profile, start a new conversation, restart CSC, and inspect any configuration sources you set manually |
| Configuration cannot be saved | Invalid configuration JSON, file permissions, or a VS Code secret storage issue | Keep the complete error message; for CSC, check user configuration JSON and write access; do not delete the entire configuration directory |
10. Contact and support
For CoStrict extension configuration or usage issues, use the existing official support options:
-
Open Settings → About CoStrict in the extension and use the issue reporting or contact link.
-
Add the CoStrict assistant on WeChat.

For API activation, plans, billing, model access, or provider outages, contact the platform that issued the key. For a company gateway, contact its administrator.
When reporting an issue, include the operating system; VS Code and extension version or CSC version; provider; service type (standard API or subscription); protocol; model ID; time of failure; steps; redacted error; and provider request ID, if available. For public reports, also remove internal domains, account information, and project content. Never send an API key.